Showing posts with label baking. Show all posts

Thursday, July 22, 2010

Original Nilla Banana Pudding

A long time ago, my Dad insisted to me that you cannot make a good banana pudding unless you made it completely from scratch. I later taught him that you could make an amazing banana pudding with instant pudding. However, I did determine that the homemade route was pretty awesome.

I promised my husband that I would make him a homemade banana pudding after surgery. Last week, he got an amazing peach and blackberry cobbler from my friend, Nicole. So, I held off until this week. It ended up being absolutely delicious :)


Here is the original recipe...I make only one adjustment to it...

Ingredients:
3/4 cup sugar, divided
1/3 cup flour
Dash salt
3 eggs, separated
2 cups milk
1/2 tsp. vanilla
45 NILLA Wafers, divided
5 medium ripe bananas, sliced (about 3-1/2 cups)


Preparation:
PREHEAT oven to 350°F. Mix 1/2 cup of the sugar, flour and salt in top of double boiler. Blend in 3 egg yolks and milk. Cook, uncovered, over boiling water 10 to 12 minutes or until thickened, stirring constantly. Remove from heat; stir in vanilla.

RESERVE 12 of the wafers for garnish. Spread small amount of custard onto bottom of 1-1/2-quart baking dish; cover with layers of 1/3 each of the remaining wafers and sliced bananas. Pour about 1/3 of the remaining custard over bananas. Continue to layer wafers, bananas and custard to make a total of 3 layers of each, ending with custard.

BEAT egg whites on high speed of electric mixer until soft peaks form. Gradually add remaining 1/4 cup sugar, beating until stiff peaks form. Spoon over custard; spread evenly to cover entire surface of custard and sealing well to edge.

BAKE 15 to 20 minutes or until lightly browned. Cool slightly. Top with reserved 12 wafers just before serving.


SUGGESTIONS/COMMENTS:

I add 1/4 teaspoon of nutmeg to the mixture in my double boiler. Jason always said that his grandmother made the most amazing banana pudding and that it had an additional flavor to it. He swore it was cinnamon, but I knew it was nutmeg.

Tonight's result was a HUGE success!! Jason and Chuck had two big helpings! And there is enough left for them to each have a helping tomorrow! Chuck's suggestion was that next time I should make more ;)

Saturday, June 12, 2010

New York Cheesecake with Cherry Topping :)


I cannot recall where I came across this cheesecake recipe, but it looked easy and pretty amazing, so I decided to give it a try for a friend's birthday.


Cake:

6 large eggs

1 1/2 cups sugar

4 8 oz. packages Kraft's Philadelphia Brand Cream Cheese

1 cup sour cream

1 cup heavy cream

3 tablespoons lemon juice

1 tablespoon vanilla

2 heaping tablespoons flour


Crust:

1 1/2 cups graham crackers crumbs

6 tablespoons melted butter

1/2 cup sugar


Topping:

1 can cherry pie filling


Directions:

Preheat oven to 425 degrees.

Set out your cream cheese and sour cream so that they are room temperature. Mix the cream cheese and sugar together...make sure you get all of the lumps out. Add the sour cream, heavy cream, lemon juice, vanilla, eggs and flour to the mixture. Mix well.

Take heavy aluminum foil and wrap it around the sides and bottom of your springform pan. Mix crust ingredients together in a small mixing bowl. Pour into a lightly greased 9" springform pan. Press the crust into place with your fingers or the back of a spoon. Once it is pressed in well, chill the crust in the refrigerator for 15 minutes.

When the crust is chilled and the cake is completely mixed, pour the batter onto the crust slowly. Let it sit for 5 to 10 minutes to settle.

In order to prevent cracking on the cheesecake, make a water bath for it. Place springform pan into a larger deeper baking pan that it will fit into easily. The larger pan should be 2-3 inches deep. Place in preheated oven. With a kettle filled with very hot water, pour water into baking pan about halfway up. Bake in 425 degree oven for 15 minutes. Then turn the oven down to 275 and bake for 1 hour. Turn off the oven but do not open the oven door for 2 hours. After 2 hours, remove the cheesecake pan from the water bath. Leave the aluminum foil in place until the cheesecake has completely cooled in the refrigerator. I generally would leave the aluminum foil in place overnight and the next day, take the foil off and run a knife gently around the sides of the springform pan to loosen it a little and release the springform pan.

Top the cheesecake with the cherry pie filling either before serving or put it on the side and let people top it themselves.


SUGGESTIONS/COMMENTS:


I did not use the water bath because the original recipe insisted it was not necessary. I definitely found out that was not true. But the recipient of the cheesecake told me he was not concerned about how it looked as much as how it tasted :) So, I decided to top my cheesecake before delivery to cover the cracking and give it a more aesthetic appearance!

And to tell you how it turned out, I dropped this off for my friend around 2 p.m. and he and his co-workers had eaten all of it but a small slice by the time I saw him at 6 p.m.! And his coworkers were raving about it! One told me it was the best cheesecake she ever had and that she normally didn't like cherries on her cheesecake but this one was perfection!

And my friend that I baked this for used to be a baker, so I asked for his verdict. He had no suggestions and said it was perfect! I was definitely pleased on the turnout :)


Tuesday, February 9, 2010

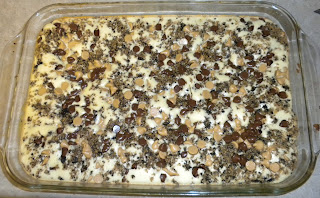
Chocolate and Peanut Butter Cheesecake Bars

As some of you may have guessed, I LOVE chocolate and peanut butter and when combined with cheesecake, what you have is a whole lot of deliciousness :)


Ingredients:

2 cups graham cracker crumbs

1/2 cup Oreo crumbs

3/4 cup (1 1/2 sticks) butter, melted

3/4 granulated sugar, divided

1 cup Godiva semi-sweet chocolate chips, divided

3/4 cup Reeses peanut butter chips, divided

1/2 cups Reeses Miniature Cups, chopped

2 pkgs. (8 oz. each) cream cheese, softened

1 tablsepoon vanilla extract

4 large eggs


Directions:


Preheat oven to 325 degrees.

Combine graham cracker crumbs, Oreo cookie crumbs, butter 1/4 cup sugar in medium bowl. Remove 1 cup mixture and reserve, for topping. Press remaining mixture onto bottom of ungreased 13 x 9-inch baking pan. Sprinkle chopped Reeses Miniature cups, 1/4 cup Godiva chocolate chips, 1/4 cup Reeses peanut butter chips over crust.

Beat cream cheese, remaining sugar, flour and vanilla extract in large mixer bowl until smooth. Add eggs, one at a time, beating until smooth. Pour over crust and morsels in pan. Sprinkle with reserved crumb topping and remaining chocolate and peanut butter chips.

Bake for 25 to 30 minutes or until set. Cool completely in pan on wire rack. Refrigerate until firm. Cut into bars.


SUGGESTIONS/COMMENTS:

I made adjustments to this recipe prior to making it because I had Oreos and Reese's cups left over from making a peanut butter cup cheesecake. Also, this recipe is a Nestles recipe from back when they made Swirled Milk Chocolate & Peanut Butter morsels.

Personally, I think the adjustments I made make this recipe scrumptious :)


Monday, January 11, 2010

My First Ever Homemade Apple Pie

Well, this was by far my biggest challenge so far!! I have always cheated it when it comes to apple pie by using premade pie crusts and even apple pie filling and then adding more flavor. I was so excited to try it even though I was terribly nervous about it. The recipe I ended up using was partially Paula Deen and a few other random sources that I researched before my first attempt. Yep, that's right, I did my homework before making the pie...looking at pie crust recipes, instructions for how to make a good pie crust, looking at apple pie recipes to find just the right flavorings, etc.


So, here's the recipe...


Pie Crust:


2 1/2 cups all-purpose flour

1/4 teaspoon fine salt

3 tablespoons granulated white sugar

1/4 vegetable shortening, cold

12 tablespoons butter, cold and cubed

1/4 cup to 1/2 cup ice water


In a large mixing bowl, sift together the flour, salt, and sugar. Add the shortening and break it up with your hands as you start to coat it all up with flour. Add the cold butter cubes and work it into the flour with your hands, a pastry blender or a fork. Work it quickly, so the butter doesn't get too soft, until the mixture is crumbly, like very coarse cornmeal. Add the ice water, a little at a time, until the mixture comes together forming a dough. Bring the dough together into a ball.


When it comes together, stop working it otherwise the dough will get over-worked and tough. Divide the dough in half and flatten it slightly to form a dish shape. Wrap each disk in plastic and chill in the fridge for about 30 minutes. On a floured surface roll each disk out into a 10 to 11-inch circle to make a 9-inch pie. (Yields 2 9-inch pie crusts) *See suggestions/comments section for more pie crust tips.


Apple Pie Filling:


3/4 cup light brown sugar

1/4 cup all-purpose flower

3/4 teaspoon ground cinnamon, plus more for sprinkling

1/4 teaspoon ground nutmeg

7 medium Granny Smith apples, peeled and cored and thinly sliced

1 lemon, zested and juiced

3 tablespoons butter, diced

Sugar for sprinkling


Preheat oven to 450 degrees. Mix together the brown sugar, flour, cinnamon and nutmeg in a small bowl. In another bowl, sprinkle apples with the lemon zest and juice and toss. Stir in the sugar mixture to evenly coat the apples.


Set aside. Roll out chilled dough into 2 circles and use 1 round to line a 9-inch pie pan. Using the tines of a fork, prick the bottom of the pie crust several times to allow steam to be released during baking and preven the crust from bubbling. Chill the other round.


Mound the apple and sugar mixture into the pie pan lined with dough. Dot with the cubed butter.


Using a pastry cutter, cut an even number of strips from the remaining rolled out dough. Transfer every other strip to the pie top and weave in the lattice by folding every other strip back onto itself and laying another strip perpendicularly. Fold the strips back across and repeat until completed.


Brush the top of the pie with milk for a brown crust, with a mixture of milk and egg yolk for a golden crust, with egg white for a shiny crust, or sprinkle with sugar for sparkly crust. (I opted to brush the top of my pie with milk.) Then sprinkle with cinnamon and sugar. Trim the overhanging dough and crimp edges.


Bake pie for 45 minutes. Let rest 20 minutes before slicing. Serve with vanilla ice cream


SUGGESTIONS/COMMENTS:


*Pie Crust tips:

When rolling out the dough, do so on a floured surface. Flatten the dough and sprinkle lightly with flour. Using a floured rolling pin, begin rolling the dough from the center outward, turning to shape and re-flouring as needed to prevent sticking. Use light, even strokes and lift the pin up as it comes to the edge. Sprinkle flour underneat the dough occasionally to prevent sticking. Roll the dough into a circle 2 inches larger than the diameter of the pie plate.


Also with water, make sure it is ice cold and added very gradually. Too much water will make the pastry tough, while too little will make it crumbly and difficult to roll out.


Another thing to note is that it calls for cold shortening and cold butter, I kept both of mine in the fridge until I was ready to use them.

Also, I laid a piece of aluminum foil over the top of my pie for a bit so that my crust topping would not over bake or burn.


To make sure you are not getting apples that are too big or too small, here's a reference for you. One medium-sized apple is about 6 ounces, 7 medium equal 2 1/2 pounds.


RESULTS:


I won't lie this is a bit of a time consuming task but well worth it. The reviews are in and according to the average person, it's amazing. According to my baking guru, I needed to roll out the top pie crust a bit thinner for the lattice topping. This would definitely have made the lattice topping even more difficult for me to make because it was breaking as I was trying to lay it out, but it was great advice. He did think it looked awesome though so that was pretty exciting for me :) Other than that, he said it was great for my first homemade apple pie and he was really pleased :)


So, I am pretty happy to have gotten such good feedback :) I don't know when I will make another one, but I now know that I can make a homemade pie crust and apple pie filling that is crowd pleasing and pleasing to the discriminate in taste :)

Sunday, January 10, 2010

Ritz Cracker Pie


This is one of my hubby's absolute favorite pies. His mom used to make it for him for his birthday every year. I am not sure where she got the recipe but she says it is also called Surprise Pie.


Ingredients:

3 Egg Whites
1/2 c. chopped pecans
scant cup sugar (which means not quite a cup)
pinch of salt
1 tsp. vanilla
1/2 tsp. baking powder
20 Ritz crackers
Cool Whip

Spray a 9-inch pie plate with non-stick cooking spray. Beat egg whites until peaks form. Slowly add in sugar. Then add pinch of salt and vanilla. Crush Ritz crackers and mix them with baking powder. Blend the two mixtures together and add pecans. Bake at 350 degrees for 30 minutes.

After cooling, add Cool Whip and serve.


I have no suggestions for this one. My mother-in-law is an amazing cook and this is a pretty great pie. It's hard to believe that it's made of Ritz Crackers. Not too difficult to make either.

Sunday, January 3, 2010

Baking Joys :)

A lot of people know that one of my favorite passions is baking! I love it :) I love making some sweet delight and gifting it to a special friend. It's always great to see the joy it brings to others when you deliver something so tasty and sweet to someone!

So, I get questions from time to time about my baking. I admit I am not an amazing baker, I am just talented enough to be able to follow most recipes succesfully. Occasionally, I try to remember to get a picture of my creation before it's delivered (sometimes after delivery too!) So, I thought that I would post some of my successes and share with others recipes that I find and try that are simply delicious :)

Happy Baking :)